Convert Python to exe
exe location: 'C:\Users\DELL\AppData\Roaming\Python\Python312\Scripts'
Steps
Step 1: Installation of auto-py-to-exe using the below command:
pip install auto-py-to-exeStep 2: Now to run auto-py-to-exe, use the following command:
auto-py-to-exeOnce you run the above command, a GUI will appear on your screen and that will help you to convert the py file to exe. This GUI offers many options like selecting the path, options like one directory or one file are our application windows or console-based, etc. We will go through each option in detail. The output will be as shown below:
Output:

Step 3: Pick the .py file that you want to convert to .exe
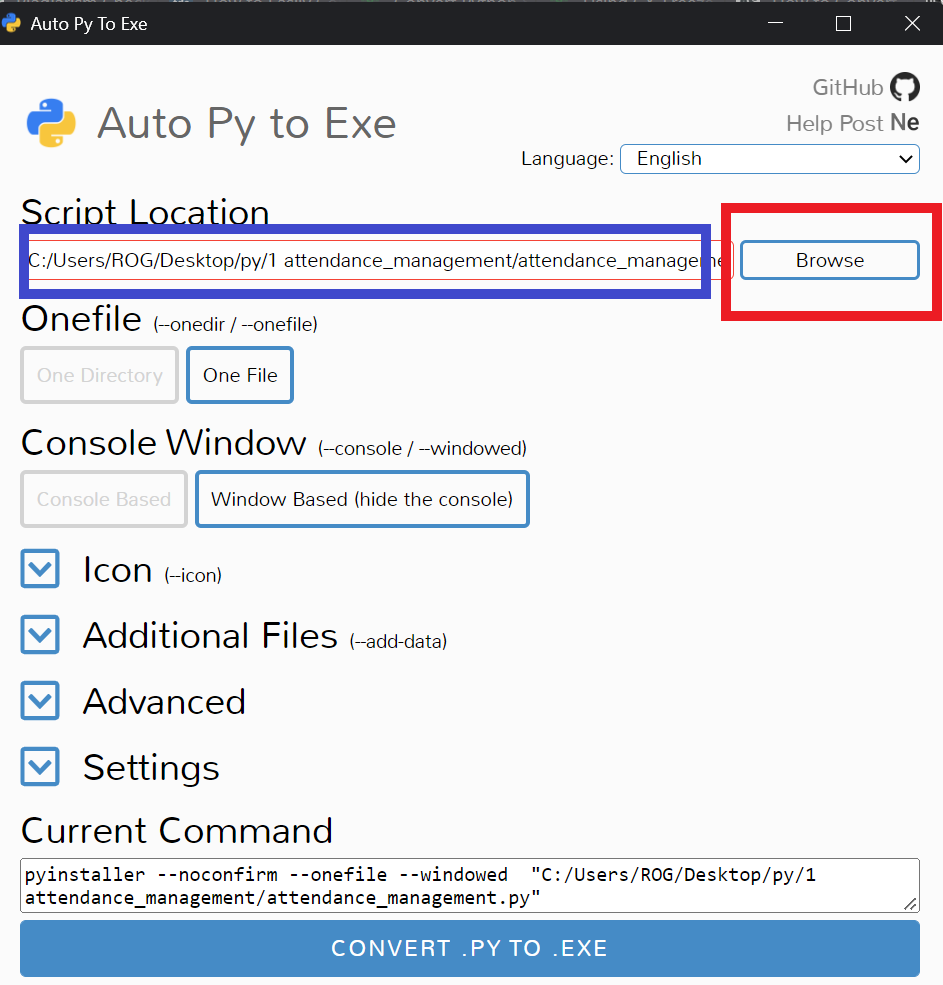
Here we will convert our Attendance Management System project python file to exe file. In this step basically, you have to select the file that you want to convert using the Browse button. The path in the blue box shows the path of your selected file.
Output:

Step 4: What to choose One File or One Directory?
One File: If “One File” is selected, “Auto PY to EXE” will produce a single .exe file that contains all dependencies but NOT media files. The following explanation can be skipped if your software solely uses the standard Windows GUI and doesn’t have any icons, backdrops, or media files, or if you’re fine with placing a media folder close to an executable file. You should read Step 5 if you want to pack media files directly into a .exe file.
One Directory: The “Auto PY to EXE” option, when set to “One Directory,” will place all dependencies in a single location. The “Advanced” menu’s “Output directory” option is available. If you put media files or folders in the Output directory, using media assets like icons and backdrops inside your .exe shouldn’t be a problem.
Step 5: Select Additional Files
You can add whatever files you want using the “Additional Files” menu in “Auto PY to EXE.” But there’s a catch. Pyinstaller is used by “Auto PY to EXE” to unpack data into a temporary folder and store the directory path in the _MEIPASS environment variable. Because the path has changed, your project won’t be able to locate the required files and won’t recognize the new path either. In other words, the selected files from the “Additional Files” menu will not be included in the .exe file if the option “One File” is selected.
Step 6: Run your program by clicking on CONVERT .PY TO .EXE
Now once you hit on that button, you might see some processes happening in the Output section. Once your file is converted (might take some time based on the size of your project) you will see two buttons at the bottom and a message as shown in the Red box will display a completion message with a path where your .exe file is saved. By clicking on the OPEN OUTPUT FOLDER, it will take you to the folder where your exe file is saved and another button CLEAR OUTPUT will let you select another project that you want to convert.
Output:


Post a Comment